LINQ acts as a bridge between Objects and Data, classic data driven applications expected the programmer to be proficient in both the programming language (C#, Visual Basic etc) and the data source native language (SQL, XQuery etc) to extract the data.
LINQ is designed to work against all data sources possible which includes objects, relational, XML etc.
LINQ allows the developer to write type-safe queries against data sources with their choice of programming languages (C#, Visual Basic). LINQ enjoys full compile-time and intellisense support.
.NET 3.5 framework supports three flavors of LINQ supported by Microsoft:
. LINQ to Objects
. LINQ to XML
. LINQ to ADO.NET [LINQ to SQL, LINQ to Entities and LINQ to DataSet]
For more details on LINQ visit: MSDN
The example uses NorthWind database. You can download and install NorthWind database from the following location.
The article will demonstrate working of LINQ to SQL enabled UI by creating an ASP.NET web-form with GridView control bound to the newly introduced LinqDataSource control (.NET 3.5 required).
LinqDataSource control allows the ability to connect data from wide variety of sources like database, collections etc, while maintaining a uniform programming model for data access.
In our example we will see how LinqDataSource control interacts with Database, when LinqDataSource control is used to interact with database it communicates with the database through Entity classes which are generated by O/R Designer (Object Relational Designer).
O/R Designer (Object Relational Designer) can be accessed by adding 'LINQ to SQL classes' from Visual Studio 2008 IDE, the designer usually creates one class mapping the database and one class each for all the tables in the database. The generated classes are typically placed in the App_Code folder of the project.
Let us see the steps involved in adding a LINQ to SQL enabled UI.
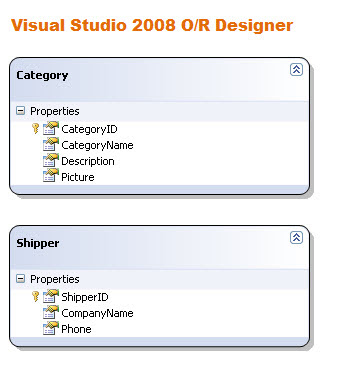
a) Use O/R designer to map the database and tables, I have added 'Categories' table to the designer, the sample web-form will use 'Categories' table to demonstrate display/edit/delete functionality:
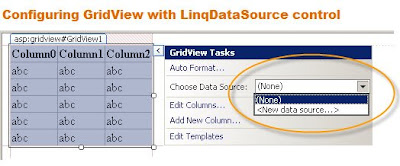
b) Add a GridView control and click on 'Choose Data Source':
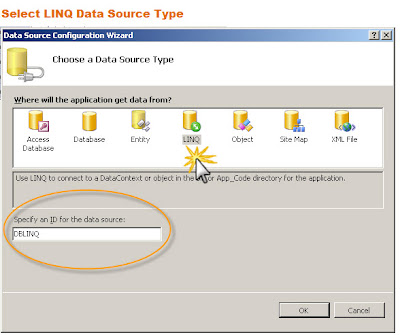
c) Select LINQ from Data Source Type and then provide an ID for the DataSource selected:
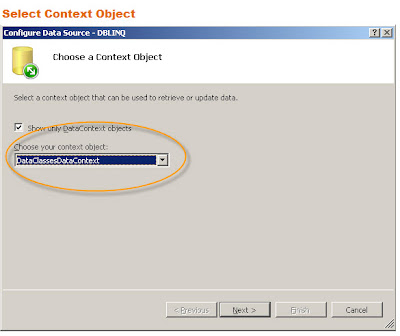
d) Choose the DataContext from the drop-down list, this is the name for your O/R designer generated class:
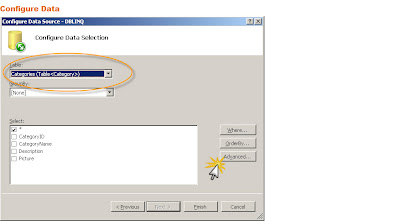
e) Configure Data Source, Pick the 'Categories' table from the Table list, Select '*' for the Columns and then Click 'Advanced':
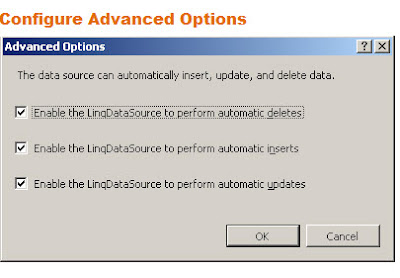
f) Select all three options to enable Insert, Update & Delete functionality:
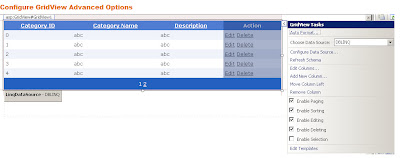
g) Select options to Enable Insert, Update & Delete functionality in the GridView control:
h) Web-form is wired with all the controls and is being displayed in 'Display' mode:
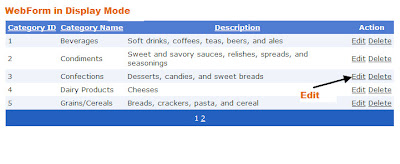
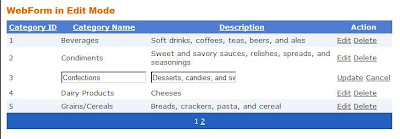
i) Web-form is wired with all the controls and is being displayed in 'Edit' mode:
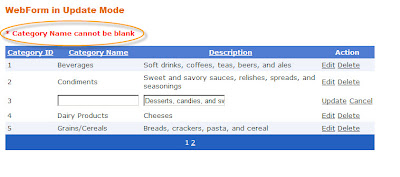
j) Web-form is displayed with warning message showing 'Category Name cannot be blank', we will visit this section in the code walk-through:
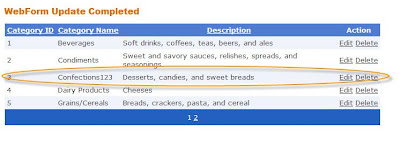
k) Web-form is displayed with successful update:
Code Walk-through:
a) Web-form declarative Markup:
<%@ Page Language="C#" AutoEventWireup="true" CodeFile="myGrid.aspx.cs" Inherits="myGrid" %>

<!DOCTYPE html PUBLIC "-//W3C//DTD XHTML 1.0 Transitional//EN" "http://www.w3.org/TR/xhtml1/DTD/xhtml1-transitional.dtd">

<html xmlns="http://www.w3.org/1999/xhtml">
<head runat="server">
<title></title>
</head>
<body>
<form id="form1" runat="server">
<asp:Literal runat=server ID="ErrMsg"></asp:Literal>
<asp:GridView ID="GridView1" runat="server" DataSourceID="DBLINQ" CellPadding="4" ForeColor="#333333"
GridLines="None" Width="700px" AllowPaging="True" PagerSettings-Mode=NextPreviousFirstLast PageSize="5" AllowSorting="True"
Height="112px" AutoGenerateColumns="False" DataKeyNames="CategoryID">
<PagerSettings Mode="NumericFirstLast" />
<RowStyle BackColor="#EFF3FB"  Font-Names="Verdana" Font-Size=Small/>
<Columns>
<asp:BoundField DataField="CategoryID"  HeaderStyle-Wrap=false HeaderText="Category ID"
InsertVisible="False" ReadOnly="True" SortExpression="CategoryID" >
</asp:BoundField>
<asp:BoundField DataField="CategoryName" HeaderStyle-Wrap=false HeaderText="Category Name"
SortExpression="CategoryName" >
</asp:BoundField>
<asp:BoundField DataField="Description"  HeaderStyle-Wrap=false HeaderText="Description"
SortExpression="Description" >
</asp:BoundField>
<asp:CommandField HeaderText="Action" ShowDeleteButton="True" ShowEditButton="True" />
</Columns>
<FooterStyle BackColor="#507CD1"  Font-Names="Verdana" Font-Size=Small Font-Bold="True" ForeColor="White" />
<PagerStyle BackColor="#2461BF"   Font-Names="Verdana" Font-Size=Small ForeColor="White" HorizontalAlign="Center" />
<SelectedRowStyle BackColor="#D1DDF1"    Font-Names="Verdana" Font-Size=Small Font-Bold="True" ForeColor="#333333" />
<HeaderStyle BackColor="#507CD1"  Font-Names="Verdana" Font-Size=Small Font-Bold="True" ForeColor="White" />
<EditRowStyle BackColor="#FFFFFF"  Font-Names="Verdana" Font-Size=Small/>
<AlternatingRowStyle BackColor="White"  Font-Names="Verdana" Font-Size=Small/>
</asp:GridView>
<asp:LinqDataSource ID="DBLINQ" runat="server"
        ContextTypeName="DataClassesDataContext" EnableDelete="True"
        EnableInsert="True" EnableUpdate="True" TableName="Categories">
    </asp:LinqDataSource>
</form>
</body>
</html>
b) Web-form Code-behind :
using System;
using System.Collections.Generic;
using System.Linq;
using System.Web;
using System.Web.UI;
using System.Web.UI.WebControls;


public partial class myGrid : System.Web.UI.Page
{
private Boolean IsError;


protected void Page_Load(object sender, EventArgs e)
{
//wire event handlers
GridView1.RowUpdating      += new
GridViewUpdateEventHandler(GridView1_RowUpdating);
DBLINQ.Updating            += new
EventHandler<LinqDataSourceUpdateEventArgs>(DBLINQ_Updating);
//ini
IsError                    = false;
ErrMsg.Visible             = false;
}


protected void GridView1_RowUpdating(object sender, GridViewUpdateEventArgs e)
{
//get the row being updated
GridViewRow currRow  = GridView1.Rows[e.RowIndex];
//check for null or empty value
string txtCatName    = ((TextBox)(currRow.Cells[1].Controls[0])).Text;
if (string.IsNullOrEmpty(txtCatName))
{
ErrMsg.Text            = "
<div style='font-family:Verdana;font-size:smaller;font-weight:bolder;
color:red'>* Category Name cannot be blank</br></br></div>";
ErrMsg.Visible         = true;
e.Cancel               = true;
//set the IsError variable to cancel LINQDataSource control update
IsError                = true;
}
}

protected void DBLINQ_Updating(object sender, LinqDataSourceUpdateEventArgs e)
{
//check if error occurred
if (IsError) e.Cancel = true;
}
}
Code highlighted with orange shows how we can add data validation logic to the update routine. This is just a basic example ideally we would have used ASP.NET RequiredFieldValidation control.
Key thing to notice is we need to add custom validation to both the GridView's RowUpdating and LinqDataSource Updating event handlers, as this gives us more granular control towards the validation.
Once the GridView's RowUpdating event handler detects an exception it sets the global variable 'IsError' to True, this variable is then checked by the LinqDataSource Updating event handler before performing the Database update. If the variable is False then the changes are saved to the Database.
Another way of handling the validation logic is to handle it in the LinqDataSource RowUpdated event handler but my personal choice is to use the approach as described above since this approach gives us more flexibility in both handling validation and providing custom feedback to the User.
I will try to provide more working examples of LINQ in the future posts!


